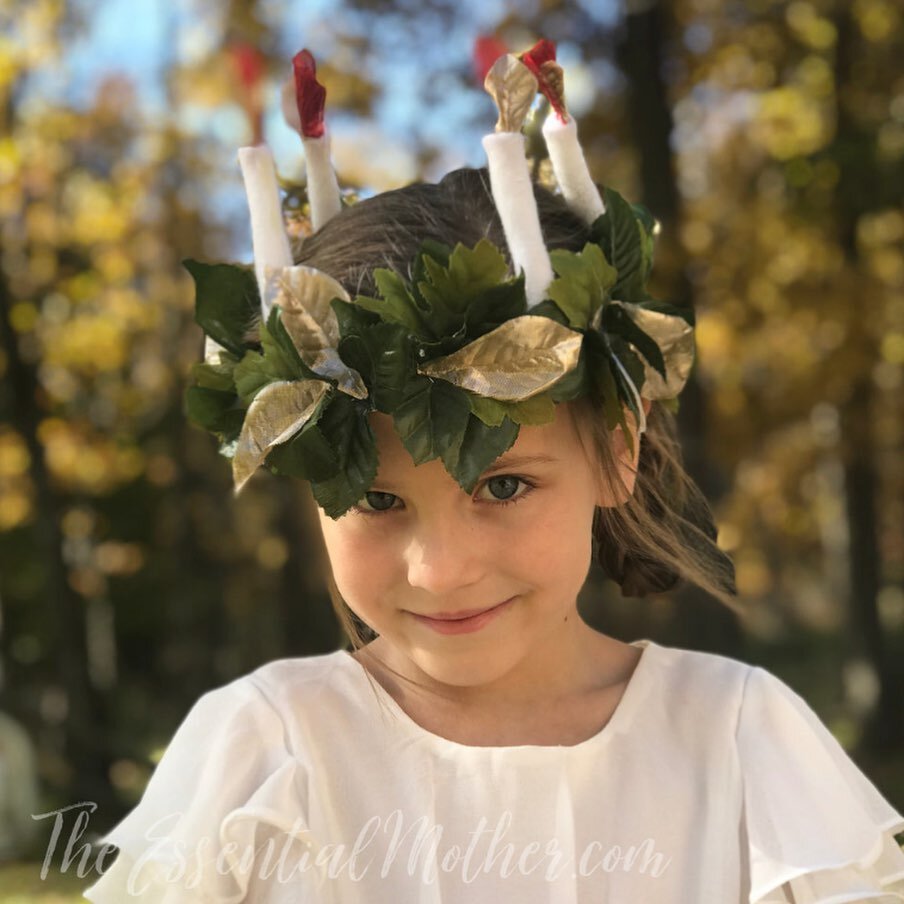
How to Celebrate a Catholic Confirmation

{This post contains affiliate links. I may receive compensation for purchases you make through my links. More info Here.}

IMG_7351.jpeg

Spoiler: There is no perfect way to celebrate a Confirmation other than to invite the Holy Spirit into the heart of your day and proceed with joy! But it is a cause for feasting and communal rejoicing… so I’ve compiled some of little touches which have helped us acknowledge the greatness of the event.

How do I prepare for a party? I essentially just poke around Pinterest until I find something beautiful that recalls to mind both guests of honor: the Holy Spirit and the Confirmandi! And then I find one item of focus and start to build from there.

As you can tell, I’m artistically minded and paint a party like a Monet. It doesn’t make sense to everyone but as long as the final picture reflects something lovely, it’s fine. My DIY blog posts will drive the super-planners among you batty. With that in mind…

Below are basic rules for putting together your party. And if you are looking for more ideas after this post, I’ve written about this before HERE .


RULE #1: THERE ARE NO RULES

I mean that. As long as you have your people, your joy, a central focus on the things of God, you’re good to go. And even if you are a hot mess with a newborn on your hip and a clogged toilet… party cheerfully anyway! The Spirit is working in you and around you… let your mess be an adventure of refinement. Offer it all to Him as a gift and let Him make it good.

IMG_7260.jpeg

MAKE ONE THING BEAUTIFUL (and put it in the middle)

No one will ever accuse me of being a domestic diva. And parties are not my strength. If that is your challenge as well, just focus on making one thing beautiful. And I don’t mean just Instagram-worthy… I mean something meaningful which has the potential to make a memory but also is oriented towards hearts.

This may sound shallow, but I find that I’m pretty good at doing this through dessert (I will share some of my successes below). And I don’t mean that I’m a great baker, only that I’m creative and find that it’s a way to express what I’m pondering about the goodness of God.

But this can be done in other ways…

Decor.
Letter writing.
Floral arrangements.
Gift giving.
Sewing.
Pictures.
Prayer.
Music.
Fellowship.
Family.


PRAY

Pray all through the prep and all through the day. Confirmation is easy because you can just pray COME, HOLY SPIRIT! and then hit repeat. It is especially helpful when you accidentally ruin the cake and have to start all over again. But also pray it all through Mass, preparations, and dish washing.

God knows your heart and hears the changing inflections. He comes because He is faithful. Bring Him into your preparations and party. Bring Him into your interactions, stress, and clean up. You will be imperfect. But He is there.

Here’s a wonderful Holy Spirit Novena to pray as well. There isn’t one specific time that a novena has to be prayed. Maybe pray it leading up to Pentacost or pray leading up to Confirmation. Novena to the Holy Spirit for the Seven Gifts

READ (and talk about it)

In the days leading up to the sacrament, walk your family through the Acts of the Apostles in Scripture. Read about Pentacost and the manifestations of the Holy Spirit. Help your family see that this is not a story book but a family history. It is real. Emphasize that this same Spirit which poured out gifts and power on the Apostles is the same one which will descend during the Confirmation Mass.

I also recommend diving into the Church’s teachings on the sacrament. Here are some of my thoughts on why Confirmation is not a “rite of passage” but a free and unmerited gift at any age. What Confirmation is… and what it is not.


WHAT TO WEAR?

I am not uptight about apparel. I used to be much more conscious of clothing details. Then two things happened: 1) I experienced a time of poor health during which I had more children and was thrilled to be able to get them out the door with matching shoes, and 2) I became more conscious of the economic disparity at different parishes and realized I was dressing my children for the wrong audience (people instead of God).

Some parishes are quite formal (like First Communion) and you will likely know if that’s the case. Otherwise, I like white and it seems to be traditional but it’s very difficult to find a modest, affordable, white, warm weather dress, so we are flexible. We once found a beautiful ice blue dress with a delicate white lace overlay and it was perfect.

That’s my long-winded way of saying that it’s important that my kids dress nicely. But for Confirmation, there are really only two requirements:

  • Clean and tidy

  • Fitting to the dignity of the person and the sacrament

We found this dress for $40 and it was perfect. There were no straps to monkey with, no plunging neckline, and no length issues. But it was modern enough to please a growing young lady.

IMG_7250.jpeg

THE FLUFFY STUFF

I will never tell you that the details are unimportant. They are important! But I also know that the means and abilities of each family vary wildly. Some will go out to a nice dinner and some will BBQ. Some will rent a hall. Some will have a quiet dinner at home. If you are a DIY party person, you might enjoy my “fluffy'“ suggestions below. Meaning that they are the extras which make life colorful… the frosting… but are non-essential…
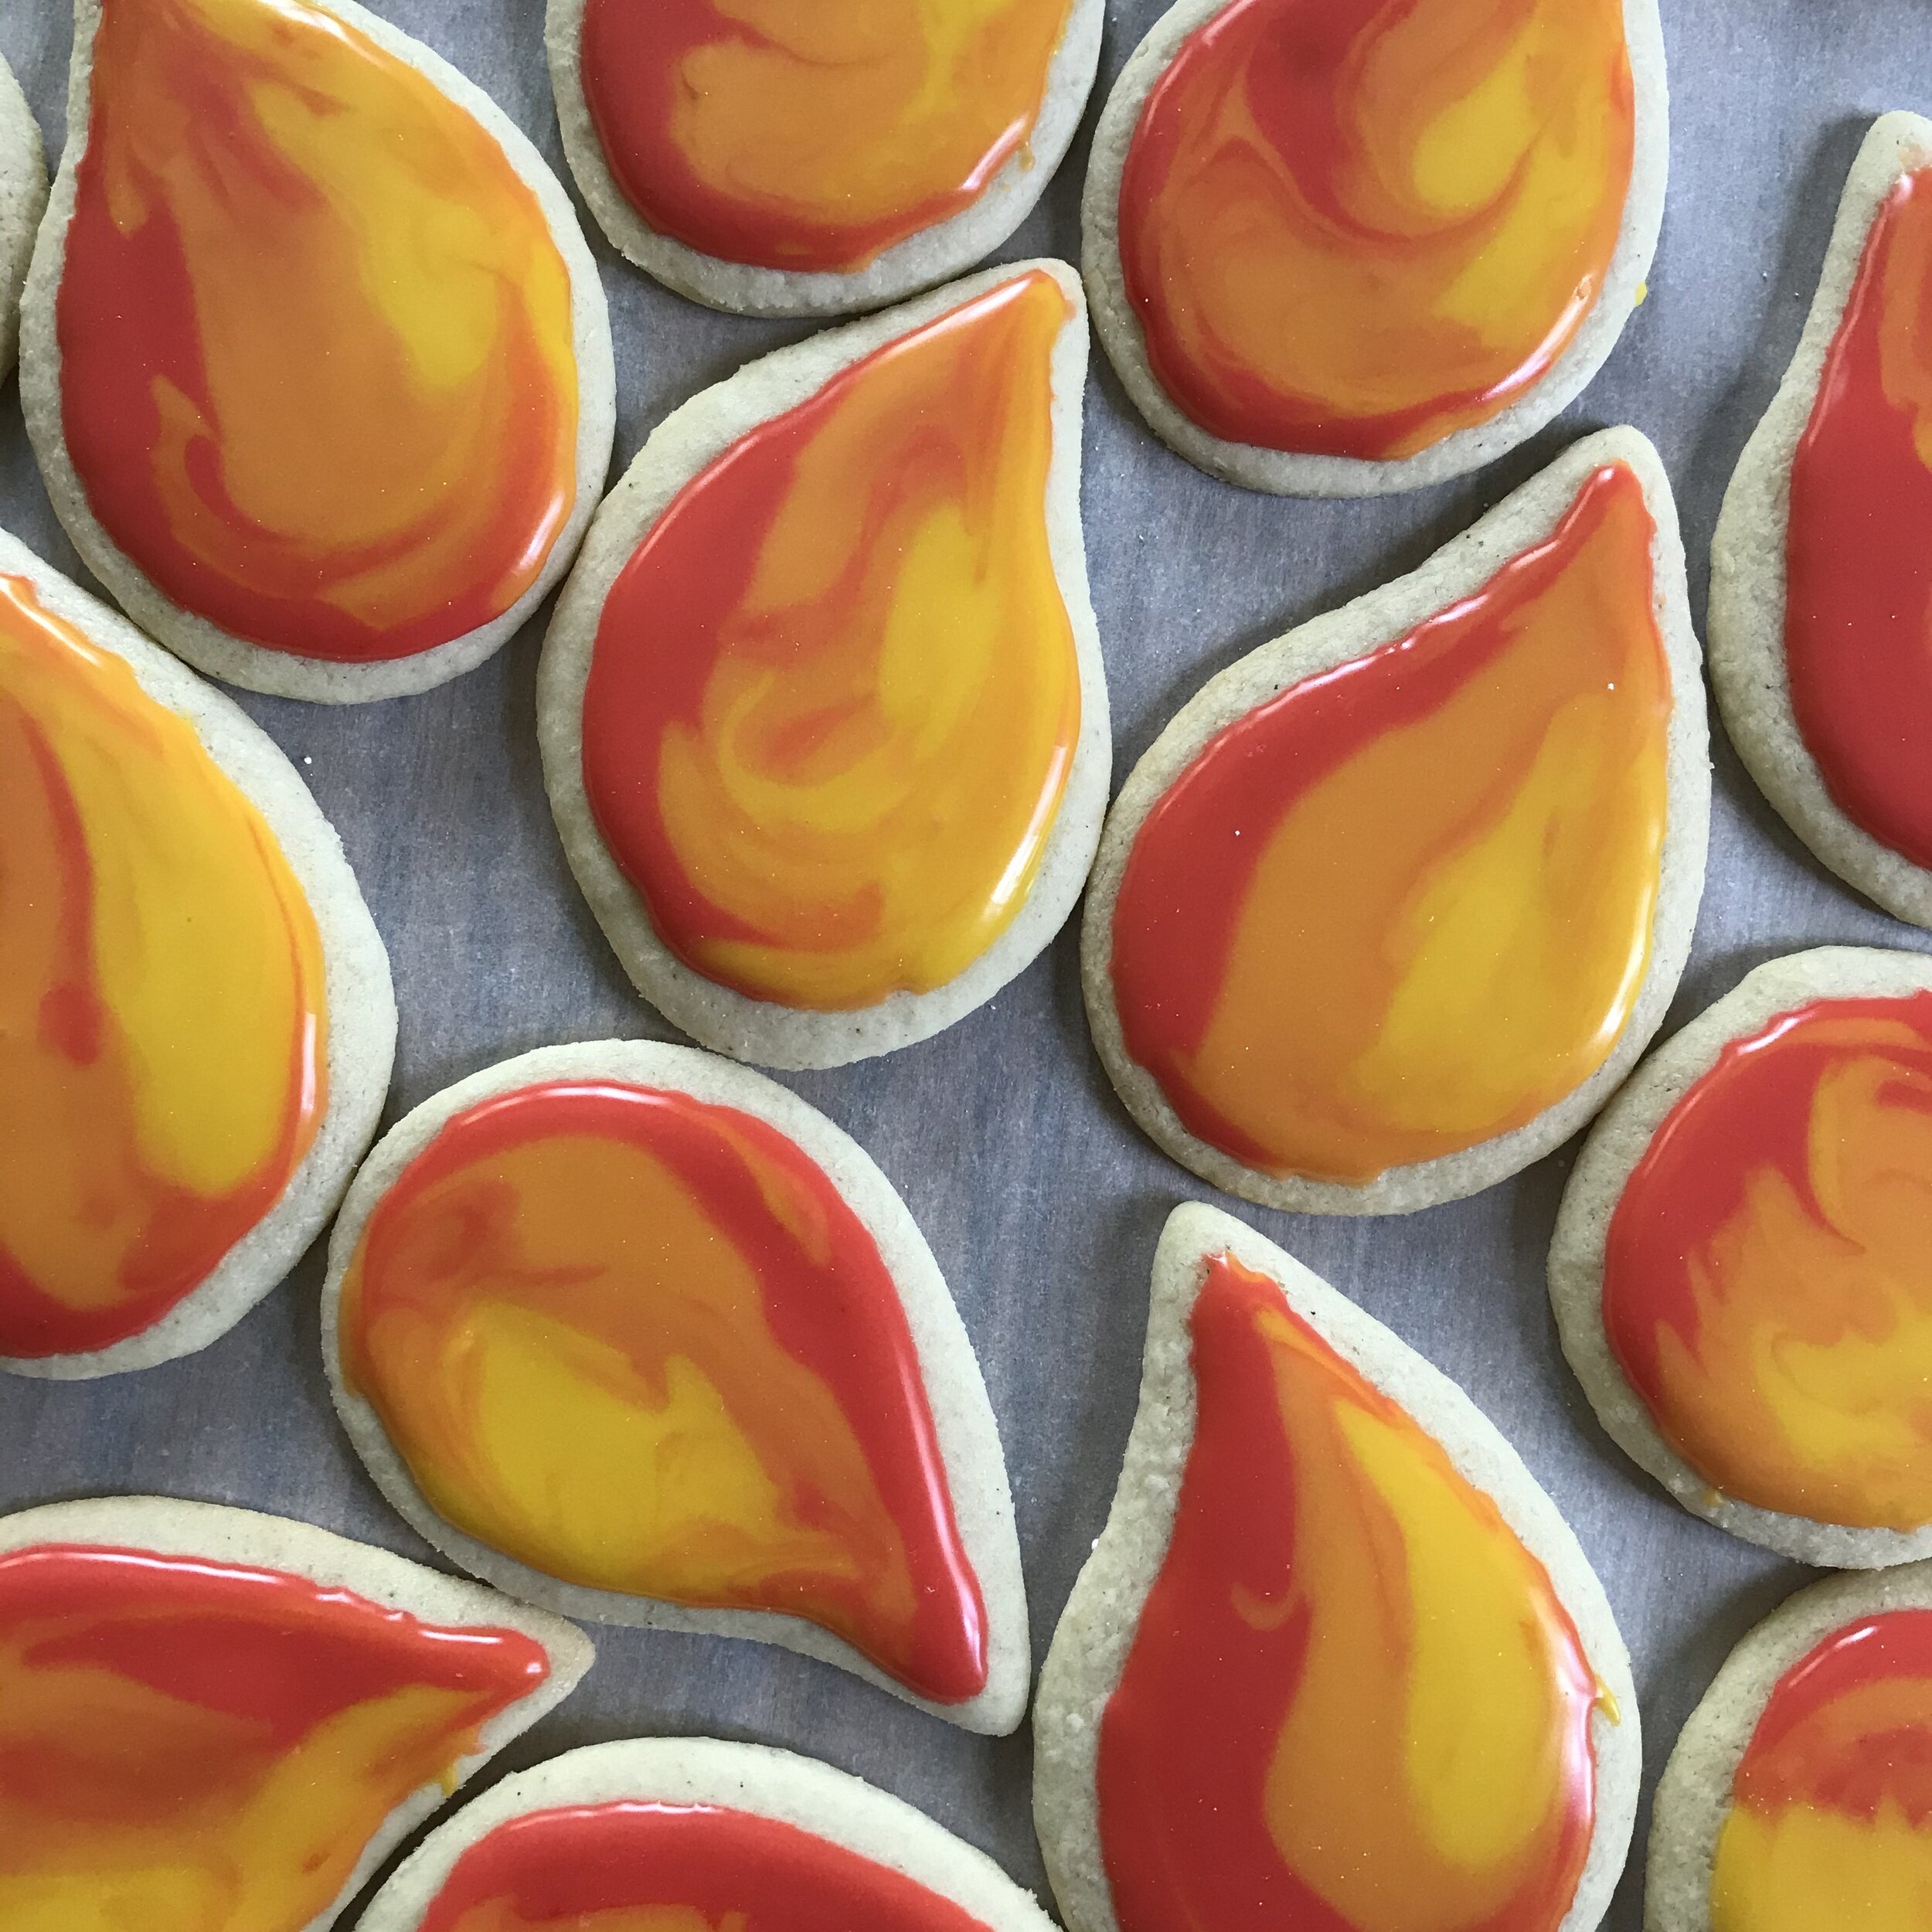
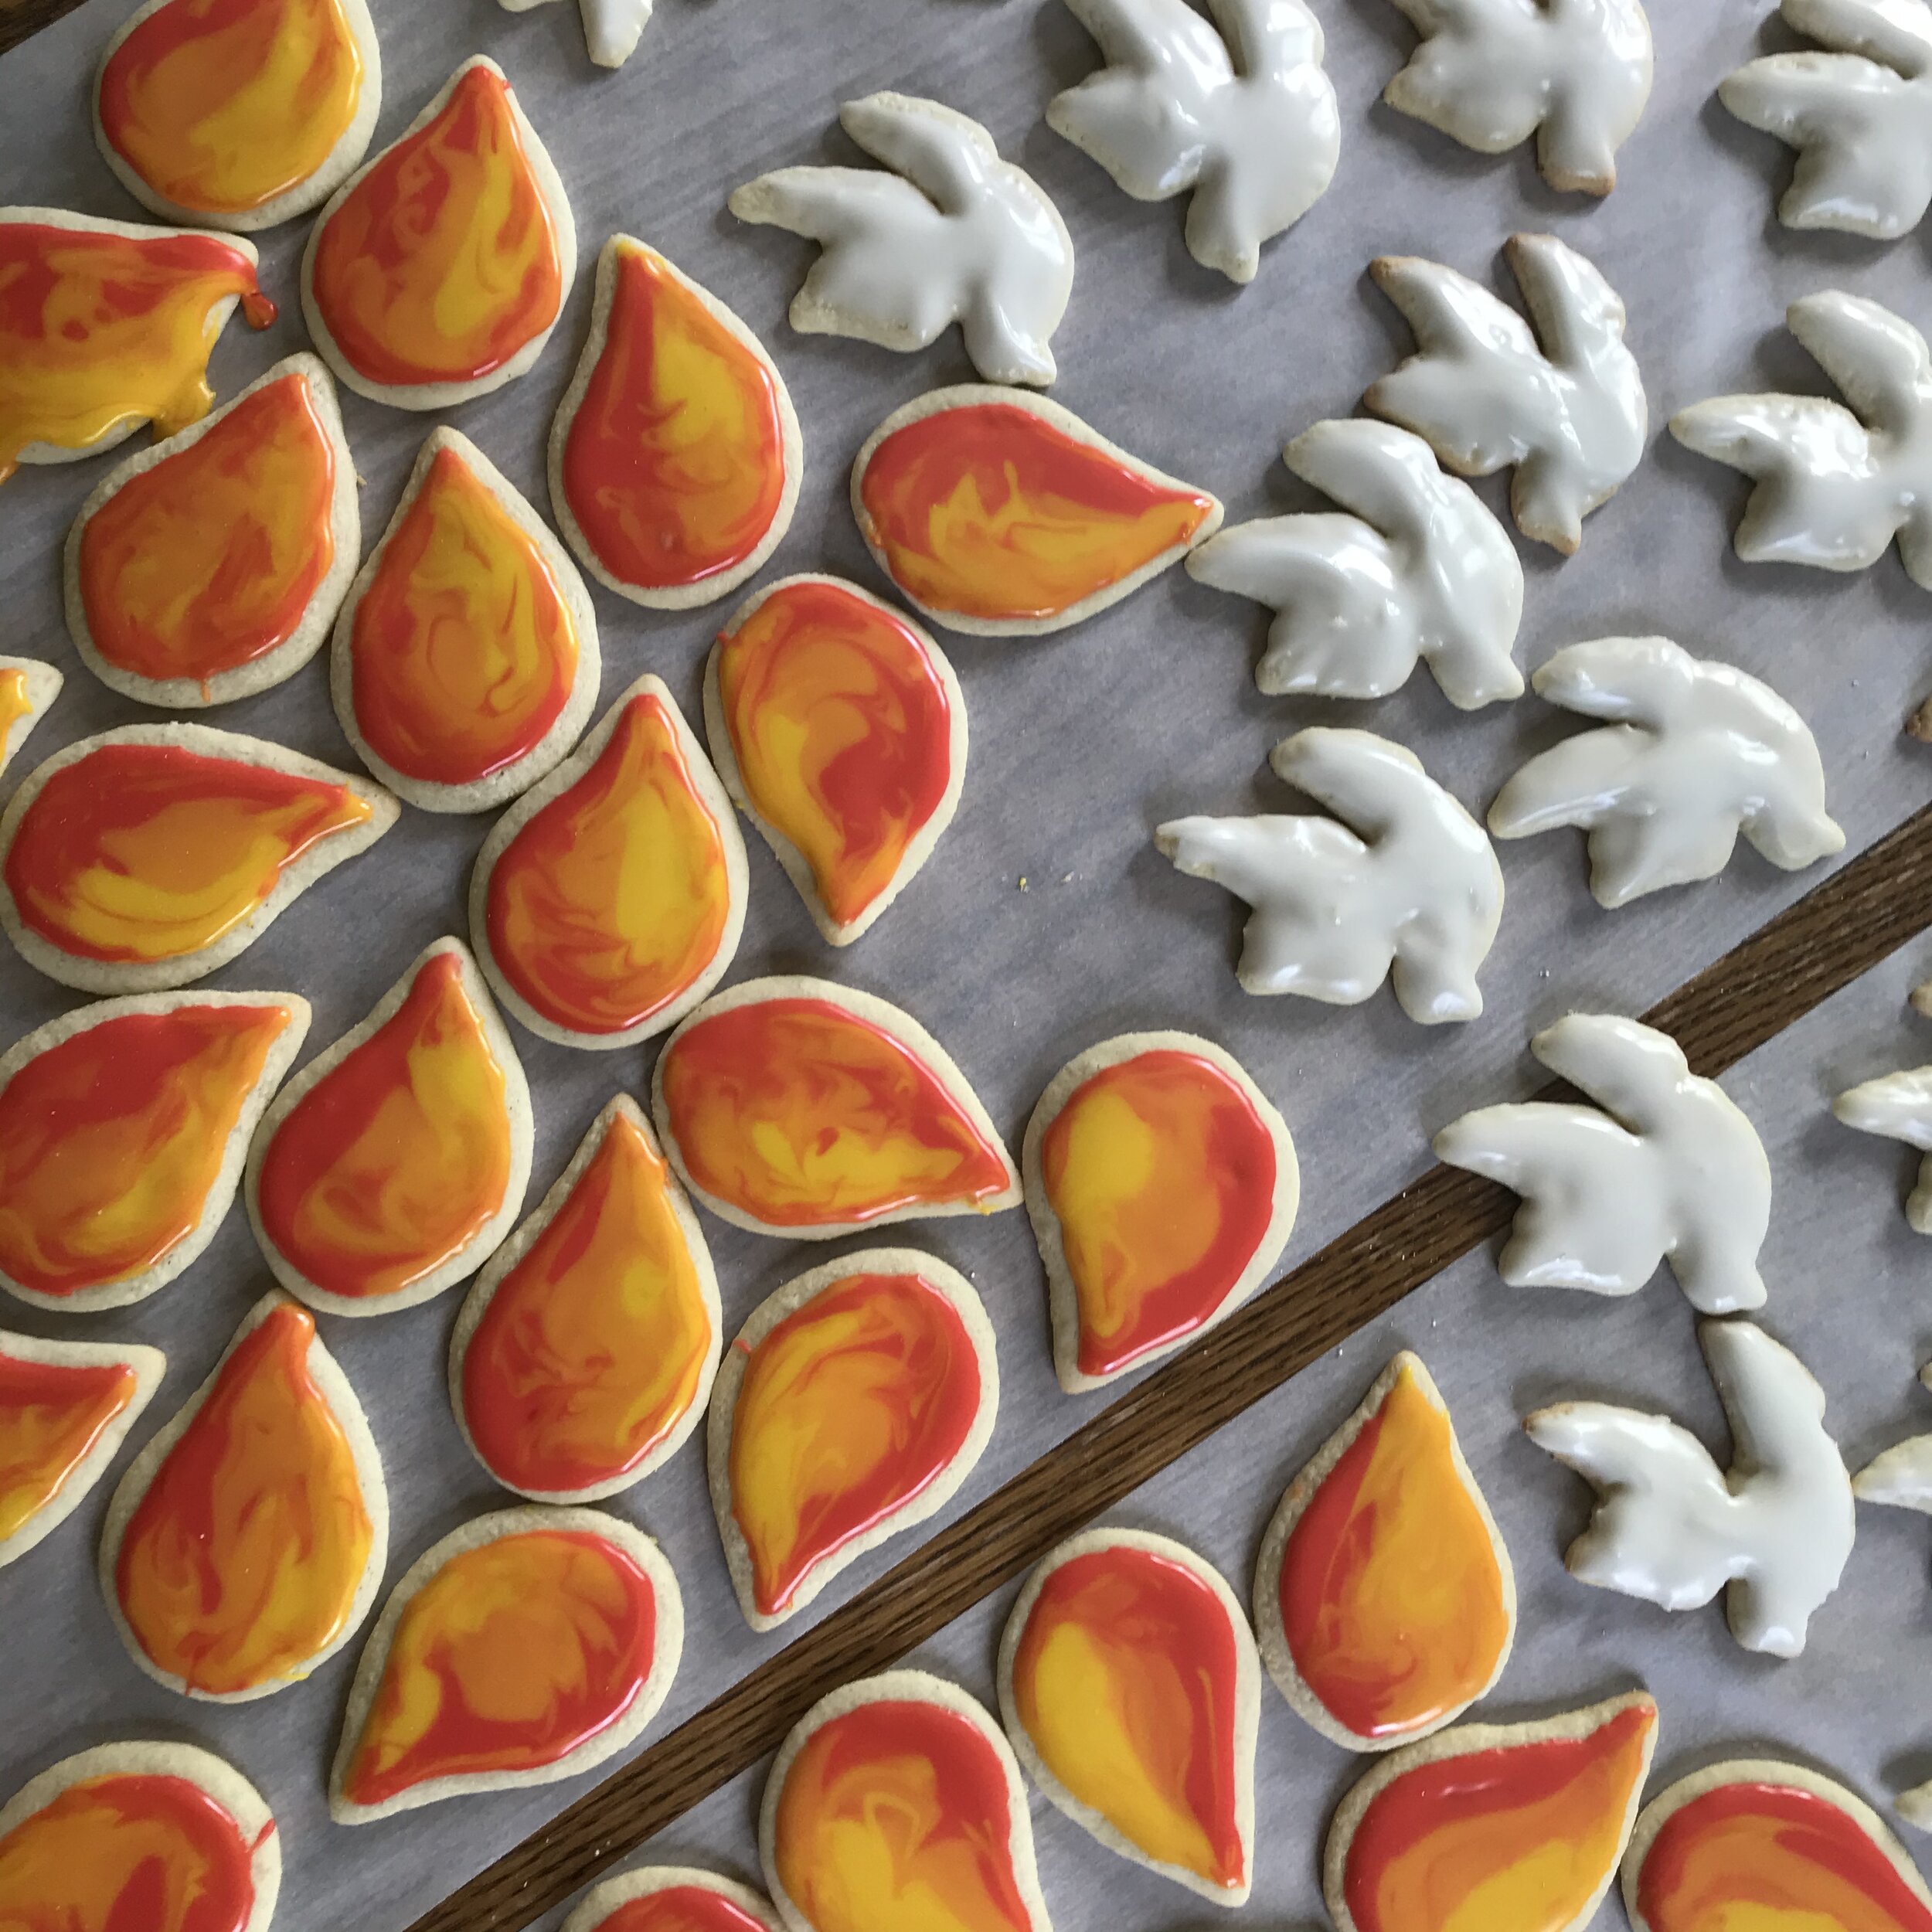

COOKIES

We go big with cookies because they are so easy to customize and feed to crowds. These cut-outs take some time to prepare in big batches and the icing takes a day to cure. But with a little planning, they add a lot of fun to our feasting. The Recipe that I use is here:

The Essential Sugar Cookie Recipe

To all of you who follow me for healthy living…

All these deserts are gluten free. None of these deserts are healthy. Listen, we live in an imperfect world with compromises. Full disclosure is that I don’t eat this stuff because my health will suffer immediately for it. But my family does. And I do my best but also remain flexible. Adapt for your circumstances.

IMG_7258.jpeg

CAKES

Decorating cakes is like a personal throw down for me. I have almost zero decorating skills but, since I am a creative/artistic person, I feel like I should be able to conquer the media without much stress. Challenge accepted! However…

A lazy and impatient cake decorator usually ends up with… a mess. Maybe tears. I try not to swear so maybe just some primal screams.

So my successes are really exciting.

Since I have not perfected a stable healthy gluten free cake recipe, I generally use a GF box mix for party-sized occasions. Perfect for a crowd that is usually predominately gluten-eating and accustomed to more commercial textures and flavors. My current favorite is Pamela’s chocolate. It tastes great and has great texture. For some reason, GF vanilla is never as moist.

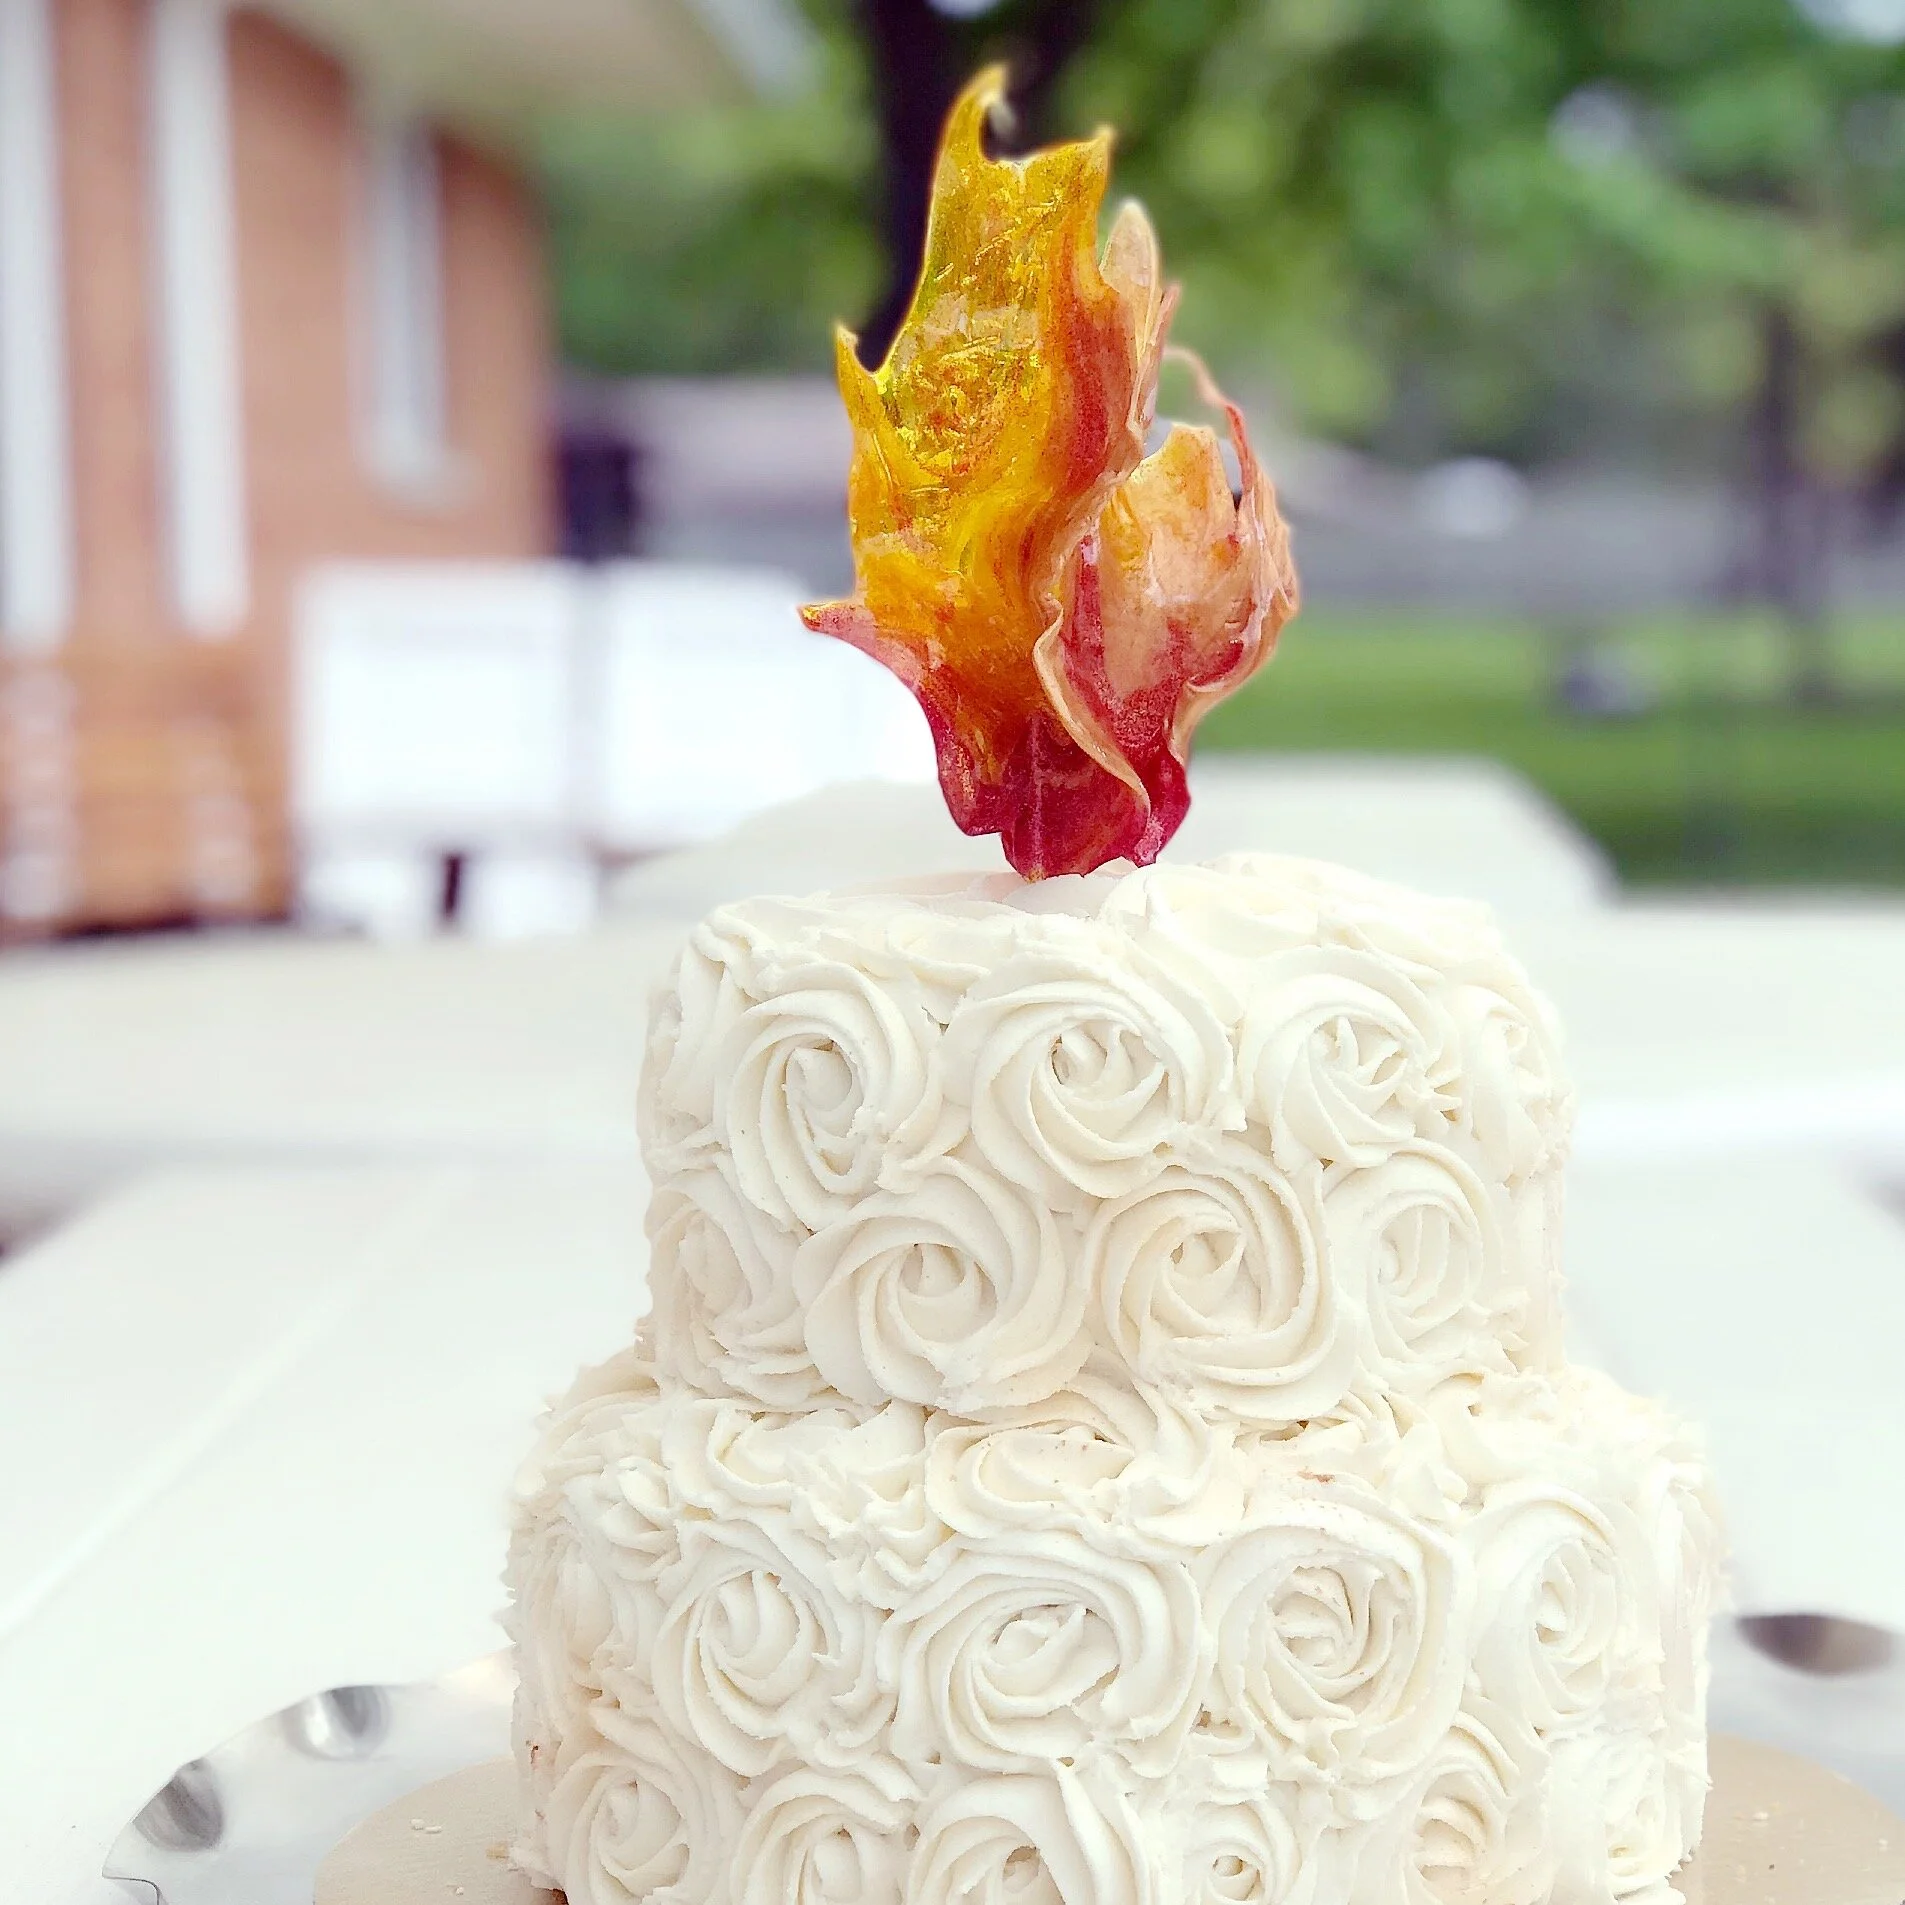
This year’s cake was the result of a vision I had after scouring Pinterest. I saw flame suckers made from Isomalt and knew instantly that I wanted them as a cake topper. Then I stumbled across a very feminine white rosette cake and the vision was complete.

I usually don’t end up with anything close to my vision. This time, I pretty much nailed it…

IMG_7352.jpeg

Working with the Isomalt was a little nerve-racking and I could have used a couple practice runs before attempting the final topper. However, I only ordered 8 ounces of Isomalt and so I had to get it right the first time. I think I will only get better at it over time. Here is the tutorial I used: Fiery Cinnamon Suckers

And here are some things I learned:

  • Isomalt is hot. All the tutorials say that but it just doesn’t really hit home until you’re pulling out the burn ointment.

  • I purchased edible glitter in red. The gold never arrived but would have been beautiful. I did use a luster dust in gold that I already had and it was pretty but more opaque than I wanted.

  • I used red and yellow food coloring

  • I did not add flavoring because I did not intend for the toppers to be eaten… even though they are technically edible.

  • I bought large (8”) sucker sticks at Walmart. I think they are meant for large cake pops. They went all the way through the cake which helped stabilize. I only needed 2 for my topper.

  • If you accidentally break your creation, you can pop it back in the oven, remelt, and fix. I did this TWICE. So frustrating. Also, my colors blended together more than I wanted. But it’s all okay in the end. Let it go. (Come, Holy Spirit!)

  • Use Silpat (or a reputable knock off) or high grade silicone. It’s really the only thing that let’s go of the Isomalt easily.

IMG_7082.jpeg

IMG_7353.jpeg

CAKE FROSTING

In my dream world, I use the finest ingredients to make buttercream. I prefer the natural cream color of a grass-fed butter used in a recipe like THIS. I don’t mind if my cake gets melty and has to be stuck back in the fridge. But…

In a party world with more people and warm weather and cake-as-centerpiece, something more stable is helpful. This Wilton recipe is my compromise with the evil of Crisco: Easy Vanilla Buttercream. Better than a grocery store cake for sure, but I still have to hold the nose of my health-conscious sensibilities…

But hey, we’ve gone this far… let’s keeping going.

My favorite filling is a flavored buttercream, using an all butter buttercream with an addition like chocolate, salted caramel, or strawberry. I used dehydrated strawberries for the flame Confirmation cake and it was delicious. I added extra heavy whipping cream to increase moisture but totally over mixed it… which was sad aesthetically but did not impact the flavor.

Note: If you want to use dehydrated strawberries for healthier deserts, I recommend organic. The link above is for Amazon since many shop there but I purchase most of my clean goods through Thrive Market. I find that items there are often cheaper than store or Amazon. Get 25% off your first order HERE.


MORE IDEAS AND DECOR

The last Confirmation party we had was definitely different in theme. I went very feminine with flowers and a dove instead of fire. Anything would have been appreciated since my children are so gracious, but I saw a picture of a succulent cake posted by a friend and… it was a throw down. I’m going to share the original link even though it makes me look bad: Stunning Succulent Cakes

Never piped flowers in your life? It’s fine. Waited until the last minute? Fine, fine. Used buttercream that melts quickly? Live and learn. The cake worked out. But the kitchen was literally covered in sugar.

I made the most beautiful fondant dove for this cake. And then I broke it. First time ever using fondant. In future, I would make the thing well ahead of time instead of last minute. My second bird was not as beautiful (because it had no wings and just wasn’t elegant like I had envisioned) and never did dry. However…

No one noticed or cared! (Second image has more accurate colors but no bird)

IMG_7359.jpeg

At some point in my cake making adventures, I purchased this set of piping tips which I have used innumerable times since then. Cookies, cupcakes, cakes, whipped cream, everything. I don’t really know how to use them well. I fake it all right much of the time.

IMG_7368.jpeg
IMG_7357.jpeg

I really love to make favors. I didn’t have time this year but that’s the way it goes. In years past, we have used Dove dark chocolate candies (red wrappers), Swedish fish (icthus!), homemade merengue candies, and fruity tootsie rolls (fruits of the Spirit).

IMG_7364.jpeg

Once upon a time, I made a fabric Confirmation banner that reads “VENI SANCTE SPIRITUS”… Come Holy Spirit! I misplaced it for this party (naturally) but I know it’s here somewhere and I do love how it turned out. It’s okay… I have 4 more Confirmations to go! You can find instructions HERE.

Holy+Spirit+banner.jpg

And that’s all for this year. I’m so excited for you and your family as you head into this incredible sacramental celebration. The Spirit of the living God will be present with you in a powerful way. What an awesome privilege!

As you prepare your home and make your lists, I encourage you to also prepare your hearts. How can we make a beautiful home for the Holy Spirit to reside? And how can we surrender our lives so that His power might rise up in us like a mighty flame of charity?

Come Holy Spirit, fill the hearts of your faithful and kindle in them the fire of your love. Send forth your Spirit and they shall be created. And You shall renew the face of the earth.

O, God, who by the light of the Holy Spirit, did instruct the hearts of the faithful, grant that by the same Holy Spirit we may be truly wise and ever enjoy His consolations, Through Christ Our Lord, Amen.

How to Rock Confirmation Celebrations (in 7 Quick Takes}

{This post contains affiliate links. I may receive compensation for purchases
you make through my links. More info
Here.} 

HS banner-2.jpg

As we head into another Confirmation season, I dug into my archives to remember some of my favorite ways to celebrate. Kiddo number 4 will be sealed with the gift of the Holy Spirit in a few weeks and so we will be busy about things like spiritual preparation and counting plastic forks. The spiritual and material inevitably collide and thankfully, we usually managed to celebrate sacramentally and materially without much stress. (Just a little. Not more than usual. Perhaps a little less. Mostly.)

Diving into the memories and my 7 top favorite ways to rock a Confirmation celebration in my big Catholic family…

1. DOUBLE THE GRACES

We once managed to get the timing just right and get two kids Confirmed at one time. It was so fun, so lovely, so fruitful, and so... so efficient that we'd love to have the rest of the kids sealed with the Spirit in pairs. It won’t happen this time around but since my current Confirmandi has asked her older sister to be her sponsor, it still feels like a sweet pairing. And they clearly were a very fun pair.

1434048950007.jpeg

We don’t break the bank for sacramental apparel since it is the overall appearance of respect and celebration that we are going for and not brand names. We picked up the jacket for the 13-year old (above) at Goodwill for $6. My daughter’s lovely dress (you can’t see the white lace overlay in my blurry photo) was 40% off at Lands End. Finding modest, contemporary, high quality lovely dresses for teen girls is not easy. This was a true win on all counts.

Probably the biggest expense of the event was finding a last minute pair of shoes for my daughter which would fit the gigantic bandage from a toe injured the day before. What would a celebration be without a little bloody excitement thrown in?

My son has since traded in his bargain jacket for lace… obviously also the work of the Holy Spirit…

IMG_5655.JPG

2. FOLLOW THE RULES

Hey, when the DRE says that they really prefer that you not take pictures, what she probably means to say is "It's okay to take grainy pics of the back of people's heads standing in the aisle with your phone as long as you don't disturb the Bishop." So... we're good.

1434049416798.jpeg

3. BE FLEXIBLE

Cakes implode. It happens. Especially when it's a gluten-free recipe that you haven't tried before. (Gluten is a phenomenal binding agent, by the way.) When it happens, beg Facebook to fix it for you and all of your friends will come to your aid within minutes. My deepest gratitude to CharlotteEllenKatieJanaMary, Meredith, Lena, and Kendra for the cake rescue help. (Good cake clearly takes a village.)

My daughter and I took the inspiration and ended up with cakes in cups that looked Pinterest-y (more or less) and tasted pretty darn good. Buttercream, yellow cake, whipping cream/cream cheese topping, a little edible gold spray (not visible in my low quality pic but pretty in person), gold and pearl sprinkles... done. And remarkably easy to serve. 

1434049721860.jpeg

The kids really wanted to reproduce these cookie successes from our previous celebration but I had to choose between cookie making and cleaning the house. This photo is regular cookies but we now make them with a gluten free 1-to-1 flour and they turn out perfect. Not health food but that’s not the vibe most party-goers are going for anyway. Recipe and more pics and tips can be found here: The Essential Sugar Cookie Recipe

1434052585631.jpeg

Also, yes… my icing is runny. I’ve gotten better at that over time but I think it suits the fire effect… kinda wild in a Holy Spirit way. Overflowing hearts with grace and passion!

1434052727500.jpeg

4. ORDER GOOD WEATHER

When you forget to feed your toddler and you need to make a hasty exit in order to correct that increasingly noisy problem… you will be so glad that you planned for a sunny day. And since I live in Northeast Ohio where the odds are (at best) 50/50, we were fortunate to get the sunshine. Toddler was pacified. Mama got to see the actual Confirmations.

1434050137722.jpeg

5. HAVE CHOCOLATE. REALLY GOOD CHOCOLATE.

From the word go, I was fully committed to the idea of some kind of decadent chocolate dessert. I found a wonderful recipe and made several batches of Raspberry and Chocolate Cheesecake Trifles. Wow. Recommended. Instead of fresh raspberries, I drizzled some raspberry syrup on the top and it was perfect. I modified the recipe to make it gluten free by replacing the chocolate cookie bottom with crumbled gluten free brownie. I replaced the Dove chocolates with chocolate chips to save money and it was still amazing.

I can no longer find the recipe on the Dove website or their Pinterest page and so I’m just going to drop my notes here in case anyone wants to try. The number of servings is not listed… sorry!

1434050372024.jpeg

RASPBERRY & CHOCOLATE CHEESECAKE TRIFLES

  • 4 oz. DOVE PROMISES SILKY SMOOTH DARK CHOCOLATE, 16 pieces (or equivalent)

  • 8 oz. CREAM CHEESE, room temperature

  • 3 Tablespoons SUGAR

  • 1 cup WHIPPING CREAM

  • 8 CHOCOLATE SANDWICH COOKIES, coarsely chopped (or crumbled brownie)

  • 1 cup FRESH RASPBERRIES (or just drizzle raspberry syrup or jam)

  • Additional chocolates for garnish

Instructions

  1. Place chocolate in microwave safe bowl, heat at 30 second intervals until almost melted. Stir until smooth. Allow to cool slightly.

  2. Beat together cream cheese and sugar until smooth. Add cooled chocolate and mix well.

  3. Whip cream until stiff peaks form. Add half of whipped cream to chocolate mixture.

  4. Assemble - place about a tablespoon of chopped cookies in the bottom of each 8 oz. jar, layer on 2 tablespoons of chocolate cheesecake mixture, 4 raspberries, a tablespoon of whipped cream. Repeat layers ending with whipped cream.

  5. Garnish with an additional unwrapped DOVE Promise. Cover and refrigerate until serving. These can be made up to 1 day ahead.


We also made up little favors with Dove dark chocolate and Swedish Fish. Get it? Dove? And the fish as a symbol of our profession of faith. 

1434050558982.jpeg

6. BE PREPARED

We are a homeschooling Catholic family with a lot of faith-based resources on hand for sacramental preparation. There's everything from the Baltimore Catechism to Lighthouse audios lining our shelves so there's plenty to choose from. In spite of that, we added an additional Confirmation resource this year called Decision Point, a program designed by Matthew Kelly. I'd like to write a full review in the future but I'll just say this for now:

It isn't the Summa Theologica. It isn't a complete presentation of the entire deposit of faith. It isn't sufficient on it's own without a richer context. But... it's a pretty rock solid program that inspired my entire family to love more and dig deeper into our faith. Kelly presents the Truth with so much real joy that it's difficult not to respond from the heart.

The material is not difficult but neither is it fluff. I've seen the program trashed by some who call it vanilla garbage. I don't agree. I think it's simple, but not simplistic. And I think that, especially in a broader parish context, it is the right combination of meat and refreshment to draw in some hardened hearts. I wouldn't rely on it alone but I'm very glad we added it to our homeschool program. 

A final positive note: Last I checked, the entire program - with DVD’s, student book, and manual - was only $16 shipped.

IMG_3753.JPG

 7. ALWAYS DIY

More low quality pictures of lovely things. I made this banner for Professor's Confirmation and was so excited that I didn't have to make anything like it again this time around. It was an easy project the first time and a finished project the second time. A great relief. Here’s how I made the banner…

1434050737929.jpeg

I used a Joanne fabric gift card that I'd been hoarding to purchase fabric for a Pentacost/Confirmation banner. I found a sturdy pretty (clearance) red fabric in the home decor section and used a lightweight printed cotton for the letters. I printed letters for "Veni Sancte Spiritus" off the computer in the desired size and font and traced them onto the fabric after I had ironed on a layer of Heat 'n' Bond. The ribbon (which is not very visible in the photos) is white satin with gold swirls. A little cutting, a little ironing, a little sewing later... I had a rather nice reusable banner.

VENI SANCTE SPIRITUS!!!

Holy Spirit banner.jpg

*BONUS TAKE*

I couldn't post this without telling you briefly about the greatest blessing of the party preparation. It came at the price of humiliation and a wounded heart (not mine) but if that's what it takes to bring me to my knees, so be it...

I did pretty well overall about staying even tempered while trying to get a pretty messy home ready for a lot of company. It's always a funny contradiction; a stressful household preparing for a sacramental celebration! I wasn't too uptight but I was rather tired. And in spite of my general success, I lost my cool with one of my littles.

I repented immediately, scooped the child up, and ran to the nearest cuddling couch. I told her that it wasn't her. I told her that she meant more to me than any party. I told her that I would rather have our guests come to a messy, stinky home than to burden her heart with my sharp words again. She cried and I cried and we sat there for a long time, leaving all the urgent things undone. 

My whole day changed in that moment. I didn't forget my priorities again (at least not that day). She's more important to me than any party. She's just as treasured as our most honored guest. It's not worth it. The pride-based stress isn't worth the bruised hearts of my children. And I went into the rest of the preparation with a sad, humbled, and rejoicing heart. He allowed me to see my priorities and set them straight and I would not dismiss the gift. Thanks be to God.

Linking up with Kelly for 7 Quick Takes Friday

How and Why to Grow Broccoli Sprouts Even if You Don't Garden

{This post contains affiliate links. I may receive compensation for purchases
you make through my links. More info
Here.} 

Screen Shot 2019-04-01 at 5.33.53 PM.png

If you want to pack a huge amount of nutrients and disease fighting properties into the smallest possible food, then you will want to learn about growing your own broccoli sprouts! Since the management of both lupus and lyme is largely directed by my intake of large quantities of vegetables, it’s great news when I don’t have to spend as much time chewing. As much as I love eating, there is something to said for efficiency, especially when you are eating consciously to heal the body.

Why broccoli sprouts? Let’s break it down…

NUTRITION

Good news for both broccoli lovers and haters: sprouts have all the nutrition of broccoli and even higher amounts with certain important phytonutrients. For example, the anti-cancer and anti-diabetic properties are much higher in sprouts than mature broccoli thanks to a nutrient called sulphoraphane. The heart benefits are also huge. Go here for a more detailed breakdown: Broccoli Sprouts Vs. Broccoli It’s all very impressive.

ABSORPTION

Nutrients don’t do us a whole lot of good unless we can absorb them and use them! Sprouts have a much higher absorption rate of sulphoraphane than broccoli… 74% versus 19%.

NO DIRT OR BUGS

I’m a wannabe gardener with a lupus-induced sun allergy. I want to garden but I cannot… yet. In the meantime, I grow sprouts neatly and successfully on my kitchen counter with zero dirt, zero bugs, and zero gardening knowledge. Plus… it’s really hard to kill a sprout in the 4-7 days it takes to grow. This is the ultimate confidence building project!

WHY NOT JUST BUY THEM?

You certainly can. But you will pay a lot more than the pennies it will cost you at home. More importantly, the greatest nutritional benefits in sprouts are found in 3-4 day old sprouts. That’s farm to table age and your typical grocery store probably isn’t able to provide something like that.

HOW TO EAT SPROUTS?

Easy. Any way you want to. A little handful on top of a salad or in a sandwich are obvious choices. But they can literally go on top of any dish you want. Top a potato or bowl of soup. Put them in a smoothie. Or just eat them plain.

HOW TO GROW BROCCOLI SPROUTS…

WHAT YOU NEED:

  • Organic broccoli sprouting seeds

  • A sprouter

  • Water

Screen Shot 2019-04-01 at 5.34.43 PM.png

It really doesn’t get simpler than this! You provide the space and a little water… the seeds (designed so perfectly to do this by God) do the rest.

The most complicated this ever gets is figuring out which sprouter to buy. I would love to buy this gorgeous $70 clay sprouter I found on Etsy but let’s be real… I have many kids and they break my pretty things. And sometimes in my haste, I also break my pretty things. Since it is not yet my season for fragile decor, I opted for a frugal option that still grows lots of sprouts, is easy to care for, and has a small countertop footprint.

I buy Organic Broccoli Sprouting Seeds from Handy Pantry in bulk (because I’m in this for the long haul) and I use this inexpensive sprouter with a small countertop footprint. It washes easily with vinegar and houses plenty of sprouts. No complaints! I also gave one to my sister-in-law for a birthday present with seeds… and I hope she still loves me. How could she not? Sprouts are a universal love language, aren’t they?

Handy pantry also has jar kits (which are adorable and not plastic) and complete starter kits with a variety of sprouters and seed selections.

Sprouting involves rinsing the seeds and sprouts daily 1-3 times for up to 7 days depending on the temperature. Direction vary slightly according to the sprouter you are using and do come with the spouters I have linked and direction also came with the seeds.

Screen Shot 2019-04-01 at 5.34.53 PM.png

I am a little silly with delight when my sprout babies start to grow. And no, my sprouter isn’t pretty. But that is quickly excused when I see the beautiful sprouts!

Screen Shot 2019-04-01 at 5.35.45 PM.png
Screen Shot 2019-04-01 at 5.34.26 PM.png

It is an amazing feeling to grow what you eat! When the sprouts are ready to serve, I just swish them around in a bowl of water to knock most of the seed pods loose. I don’t mind having a few so I’m not uptight about this.

And that’s it! If you are serious about health and beautiful food, you should definitely sprout! Enjoy!

how to grow broccoli sprouts.png

The Oil Cleansing Method of Washing Your Face

Your skin is your largest organ and the most chemically absorbent part of your body. What are you putting on your face?

I wash my face with oil.. and get a lot of funny looks when I say that! It certainly sounds strange since most people are trying to get the oil off of their faces. But surprisingly enough, it does work, and is a gentle and lovely solution to those with sensitive skin. 

I've been moisturizing my face with plain oil since 2013 after bad experiences with all commercial products I tried; but I still hadn't found a cleanser that I loved. And even though I did like my moisturizer (handmade goodness from Etsy), the price tag was more than I found reasonable over the long term. As I neared the bottom of my final bottle, my stubbornness reared up and I put my foot down:

I need this lotion... BUT... I'm not paying that kind of money again. I'll make it myself.

So I purchased ingredients to make something of my own design and while I waited for them to arrive in the mail, I ran out of lotion. I needed something to moisturize with because my face would burn and turn red after I washed with soap. I did a quick internet search and discovered that I could just use plain... oil.

I ran to my cabinet and pulled out a bottle of almond oil. This will do, I thought. And it did. I thought I would break out in horrendous acne. But I didn't. Instead, it felt lovely and did the trick. I never did end up making the lotion (although it is still on my to-do list) and I have since discovered the simple art of washing with oil as well.

Washing Your Face With Oil

The how-to of oil cleansing is beautifully simple. You need only two ingredients: castor oil (for cleaning) and a moisturizing oil such as 100% pure olivehazelnutalmond, or grapeseed. A little research and experimentation will help you discover which of these oils is best for your skin.

I made my first batch with equal parts castor and almond oil. It was actually a little drying and I have since decreased the amount of castor oil to 1/3 with happy results. Everyone's skin is different so this really does end up being a bit unique for each person.

The Ingredients

1. Castor Oil - Draws out Dirt (some people with sensitive skin might want to limit this almost entirely if it is too drying)

2. Olive or other moisturizing oil (My preference is almond oil)

3. Experiment with adding your favorite (therapeutic grade) essential oils for scent and skin benefits. My recommendations are frankincense, tea tree, and lavender.. 

It cost me only $5 to make 6 ounces of cleanser, which will probably last me a very long time. It sits on the bathroom counter with a homemade label that reads (in red sharpie):

Mommy's Face Wash... Do Not Touch! 

(Which, of course, made all the children want to touch it asap.)

The Method

1. Pour a small amount of oil (nickel to quarter size) into your palm and using your clean fingertips, massage it into your skin (apply to dry face). Gently rub it in for about a minute. No need to scrub.

2. Wet a washcloth with hot water (please don't burn yourself) and lay it over your face, letting it cool until it is about room temperature. This is where a lot of cleaning action happens. It has been so cold here that my washcloth cools off super fast... so I have been repeating this step with the other side of the cloth.

3. Rinse the washcloth out (or just use the corners) and wipe off the oil. Again, do not scrub... just wipe it off. You'll have some residual oil but you really do want that.

4. To moisturize, I use a combination of two pure ingredients: yarrow essential oil and pomegranate seed oil in the morning, after I wash my face, or before bed. (Find it HERE) It is especially helpful around the eyes and a little goes a long way. If I need extra moisturizing in the winter or after a lot of sun exposure, I will use some DIY body butter to which I add frankincense.

The Results

This stuff cleans extremely well. A pre-wash is unnecessary because the oil is the perfect makeup and dirt remover. Oil removes oil. I find that this method works much better than scrubbing with soap and water.

I have acne-prone and lupus-damaged skin. I'm a 40-year old woman with just as many problems as I did when I was a teenager! I assumed oil would make it worse but instead, I have experienced a very rapid improvement. Dry patches and oily patches equalize and breakouts have decreased. My skin is softer. I can't do anything about contact sensitivities but I can do my best to have a healthy baseline.

Lupus is particularly brutal to my poor face. This method is extremely gentle and nourishing for my often delicate and wounded skin. 

The Essential Poison Ivy Remedy

We have a teenager who is an expert at finding poison ivy and now we finally have a way to treat it that doesn't involve steroids and antibiotics! If we need them, we will use them, but we are on three rounds of this natural solution and... so far so good. The teen who keeps getting into the poison ivy does not like the smell and says it stings when first going on (courtesy of the cider vinegar) but he also says it's well worth it. 

After his first poison ivy experience, he moved all of his climbing and building materials to the front of the house. Not my favorite place for his collection but he was not eager to get that itchy rash again! Fortunately, a quick and effective handling of the situation had him back in the woods in no time... and all of his wood and rope and energy with him! 

When making this recipe, be sure to use good quality pure essential oils (NO Walmart!!) or else the synthetic fillers are going to irritate and make the whole thing worse. (For beautiful, pure essential oils, scroll to the link at the bottom of this post.)

We did have the benefit of being able to start this application right from the beginning of the rash the first time and I think that contributed to the overall success of the remedy. My boy was pretty unhappy about the whole thing, feeling confident that he wouldn't have trouble handling it without the "stinky stuff." But I insisted and he saw dramatic improvement in just one day.

The result was that he ended up feeling overly confident and refused further applications... which ended up in worsening rash... which resulted in a reapplication... which ended with a resolved poison ivy episode in only three days. Not too shabby.

He had the marks for over a week beyond that but there was no further itching or irritation. Needless to say, the next time he developed poison ivy, he was more than willing to submit to mama's home remedy!

My daughters would be more sensitive to any marks or scarring from the harsh poison ivy rash. In their case, I would use frankincense and lavender to help soothe and heal the skin. 

Here's the recipe. It doesn't make much to get the job done but feel free to double and triple if you've got a large area (or family) to cover...

The Essential Poison Ivy Recipe

  • 2 Tbsp organic apple cider vinegar
  • 2 Tbsp distilled water
  • 1 tsp sea salt
  • 3 drops lavender essential oil (for itch)
  • 3 drops tea tree oil (antiseptic)
  • 3 drops peppermint oil (soothing)
  • Mix until dissolved.
  • Store in fridge.
  • Apply repeatedly throughout the day until resolved.

And it should go without saying that if your poison ivy progresses beyond your ability to self-treat, please go see your doctor! 

What other natural poison ivy tips do you have? Please share in the comments!

Looking for quality essential oils? Click below for the oils my family uses with confidence. 

Paleo First Birthday Smash Cake

{This post contains affiliate links. More info Here.} 

My last three babies have received the most benefit from my healthy dietary changes. They were gluten and garbage food free in the womb, through the duration of nursing, and only very slowly did junk food come into their lives after that. It's always a little sad when that happens. And... it usually happens at Grandma's house... as it should be!

For two of the three, their introduction to the world of sweets came at their first birthday party. Who is going to deny that sweet face a piece of birthday cake and ice cream?? 

But I just couldn't do it this time. Soon enough, he will be sneaking sugared orange gummy candies out of Grandma's candy jar. But not yet. 

So I made him a little cake that I knew would nourish him and wouldn't end up making him feel crummy at his own birthday party. It's paleo, gluten free, and obviously delicious.

The rest of my kids were not as excited about a non-sugar birthday party so I broke down and made our favorite junk food box mix cake for them. We were at Grandma's after all. But I shared the baby's cake with him and we were just as happy as the little sugar fiends hopping all around us. 

The Essential Paleo Carrot Cake is not only a healthy treat for the littles but also happens to be MY birthday cake of choice! The frosting recipe is a light and refreshing paleo coconut cream. Or you can just cover your cake in berries like my daughter did for my birthday (below). But if you don't mind some dairy and a sugar splurge, the traditional cream cheese frosting is a great option. 

Carrot cake.png

This is my favorite brand of coconut milk because it doesn't have any ingredients other than pure coconut milk and water. Coconut Milk

This recipe makes two 9-inch rounds or 24 cupcakes. To make a little smash cake, bake your cake as directed and cut a smaller cake out of the center (one or two layers... one layer is pictured above). I used a bowl as a guide and cut around with a sharp knife before frosting. Do what you like with the outside edge scraps. I freeze them for an amazing breakfast treat.

The Essential Paleo Carrot Cake

How I Do Mornings Without Coffee

{This post contains affiliate links Thank you for supporting my family! More info Here.} 

I don't drink coffee. I don't even like coffee.

There... I got that out of the way. Can we still be friends? 

Other than the surprising news that I don't share most of the world's love affair with coffee, people are most confounded by how I manage to function without the caffeine. Well, okay, I'm tired... a lot. But I also have 8 kids so expectations of being well rested are reasonably low. 

I suppose the real question is...
How do I function well without that shot of caffeine in my life? 

The overreaching principle of my daily healthcare is that before "self-medicating" (deliberately consuming caffeine to stay awake, etc), I consider if there's a need that can be met by a healthier means. In the case of fatigue, the obvious answer is MORE SLEEP. But since I am a homeschooling-entreprenuerial-mother-of-8... I need a little more help than that. 

I have heard from many people who wish they could kick coffee to the curb or at least limit it to a moderate amount. They are tired of the caffeine crash headaches, insomnia, caffeine-induced anxiety, their financial contribution to the Starbucks empire, caloric excess with specialty coffees, and desire to limit the use of addictive stimulants to keep them going. 

The news is also spreading that caffeine and autoimmune disease to not mix well... and we all know that autoimmune disease is on the rise

Here is my personal plan of action for those of you who are trying to kick (or reduce) a coffee habit...

SLEEP.

Just restating the obvious here. For some of us (moms with babies, toddlers, or teenagers, for example), more sleep is not always an option. God bless you hard working caregivers! Virtual fist bump from a mom who hasn't seen 7 hours in a very, very long time. 

For those of you who have other reasons for not sleeping (overworking, insomnia, stress, evening internet use, pain, etc.), there are other resources for helping with that. But... coffee is not one of them. Coffee does NOT help with sleep.

JUST SAY NO.

Whittle the schedule down to the bare minimum. If your 3-year old is already in ballet and soccer, I promise you that declining another activity will not ruin her life. It's more likely that a tired, cranky mother will mess with her quality of life, to be honest... speaking from experience here.

My unscientific observations tell me that most people use coffee to propel themselves through overbooked schedules of their own design. If you say no to extra obligations, you will not be less busy (something will always fill up your time!) but you will find your activities more manageable. 

I have some very big obligations in my life that keep me busy 100% of the time. That means I have to say no to other opportunities pretty much daily.

NUTRITION

The average American diet is saturated with energy-sapping ingredients. White flour, sugar, chemical additives, empty calories... none of which are going to keep you going beyond an initial burst. In fact, the net effect of a lousy diet is that we force our bodies to run on empty constantly. Calories? Sure... we've got those. Real nutrition at the cellular level?

Epic cultural fail.

Switching to a nutrient dense diet will do more for your body and energy level than a cup a joe ever will. (Read: How to Transform Your Health Through Diet)

WATER

Odds are that you have your fancy water bottle already. Use it. Your body needs water. You already know that water consumption increases energy and body efficiency! Don't make me nag you!

SMOOTHIES

This really should go under "nutrition" but smoothies are my favorite way to get started in the morning so they get their own category. I don't think I ever make the same smoothie twice (who has time to measure?) but I do have some (but not all) favorite ingredients...

ESSENTIAL OILS

Peppermint, lemon, and orange are my happy-wake-up oils. Seriously! I diffuse or apply them in the morning and take them with me when I go. They are particularly helpful on a car ride when my mind is not working quickly and I want to make sure I'm driving safely. More info about these great natural resources HERE.

PRAYER

Stress and anxiety exhaust us. They cause us to lose sleep, they tax the adrenals, they wreak havoc on our mental clarity and relationships. There isn't always a way to eliminate big stressors in our lives but the fact is that those who have a strong faith, have greater interior peace and better health. 

If you don't know how to pray or do pray but aren't sure you're grasping the full benefit, I highly recommend this slim volume called Prayer for Beginners

I read it when I already considered myself a veteran to prayer... and it helped bring a greater simplicity, clarity, and peace to my existing spiritual life. 

EXERCISE

I almost forgot this one (thank you for the kind reader who reminded me!)... probably because I like to sleep a whole lot more than I like to exercise. ha. But studies confirm that exercise increases energy and fights fatigue. People with autoimmune disease or adrenal fatigue have to be a bit more strategic about when, how, and how long they exercise (I'm just going to cite this as my excuse for sleeping in) but physical movement is still a critical part of their energy tool box and long term health.

What else am I missing? Let me know what your tips are!

Transform Your Health Through Diet (8 Steps)

Whether I'm talking to someone who is in need of healing or examining my own life, I always put nutrition first because it must be first. Nutrition is the fuel that runs our bodies, our brains, our hormones... everything. Our bodies are incredible.... AMAZING... beautiful... and we were designed to function optimally with nutritious food; but the typical American diet does not take those needs seriously. Consequently…

We live in a first world country that is plagued with disease... much of which is self-inflicted.

It is common knowledge that much disease (and symptoms of unavoidable disease) can be eliminated or reduced by eating a nutrient-dense, garbage-free diet and living a healthy lifestyle. Modern medicine is marvelous... but no doctor or surgery or medication can replace God's plan for normal, healing nutrition.

(Pause for a second and read my disclaimer HERE. I'm not a substitute for your doctor. Consider me an accountability partner in a life of joy and health.)

If you exercise every day but stuff your body full of garbage, you are setting yourself up for failure. If you exercise daily, eliminate garbage, but do not meet your body's fundamental nutritional needs, you are still setting yourself up for future problems.

The following information contains the skeleton of my personal nutrition plan. When someone asks me how I eat (or ideally eat), this is what I tell them...


TRANSFORMING MY HEALTH THROUGH NUTRITION (8 Steps)

  1. CUT OUT GARBAGE

  2. INCREASE REAL NUTRITION

  3. SHOP THE PERIMETER

  4. THE FEWER INGREDIENTS, THE BETTER

  5. EAT NUTRITIONALLY DENSE FOODS

  6. EMBRACE THE FAT

  7. CAREFUL SUPPLEMENTING

  8. NEVER STOP LEARNING {FIND A GOOD SUPPORT SYSTEM}


1. CUT OUT GARBAGE

The human body is incredible! The balance of hormones and systems is finely tuned and designed to function with seasonal, real food. It is extremely resilient and can survive and thrive for a long time on inferior nutrition or periods of fasting, through days, seasons, and even decades. But if we use garbage "food" to fuel the body on a regular basis, we will eventually damage the beautiful machine.

The good news is that the body also has a remarkable ability to heal. If you're like me and have abused your own body nutritionally for most of your life, then it might take a longer period of hard work... but every small step is worth it! I'm on my 6th year of gluten-free, clean eating and I'm not tempted to go back. I cannot overstate the positive effect that those changes have made on my life.

Once upon a time, I told my husband I thought that I would die if I had another baby and I truly believed it because I was THAT sick. But in between that pregnancy and the next, I changed my diet and consequently, my life. And I didn't die. Not even close.

When I was 35, I told him that I would surely be in a wheelchair by the time I was 40. I am now 39... and thriving.

LET'S BE HONEST... The trial of going without chemically enhanced lattes and Oreo cookies is a first world problem. You don't have to have them. And the obligations of your vocation may be calling you to let them go. If you eat junk regularly and also complain about IBS, fatigue, diabetes, joint pain, headaches, etc... then it may be time to start thinking about the stress you've been putting on your body all these years and the investment you want to make for the future.

The good news is that now is a GREAT time to begin to make changes regardless of the challenges you face in life. There is always a small change you can make toward health.

THINGS TO CONSIDER ELIMINATING IMMEDIATELY:

  • CORN SYRUP. This should not even be used in moderation. It has no nutritional value and wreaks havoc on a body. It's also in almost everything modern Americans eat.

  • WHEAT/GLUTEN. Wheat is not inherently evil... but the way that the majority of flour is produced in the last 50 years renders it a nutritionally empty source of calories, and increasing numbers of people are developing sensitivities. If you do not have an intolerance, you will still benefit nutritionally from replacing most or all of your bread and pasta with vegetables and nutritionally dense carbs. You will eliminate an inflammatory food and you will also eliminate a huge source of extra pounds! The elimination of gluten changed my life.

  • PACKAGED FOODS. There are exceptions to the this but in general, if a food is packaged, it needs non-food chemicals to keep it from rotting, breaking, separating, or to enhance its denatured flavor. Added up over the course of a day (and a life), the cumulative impact can be significant. 

  • PACKAGED FOODS LABELED 'GLUTEN FREE'. Make no mistake... The majority of packaged gluten free food is junk food. Completely nutritionally empty. Just eat real food instead or find companies that produce nutritionally, garbage free products. Have you ever heard anyone say "I gained weight on a gluten-free diet"? Yep, me too... all the time! Well, that outcome makes sense if they are simply replacing their empty carbs with more empty carbs.

  • ARTIFICIAL SWEETENERS. Most simply are not healthy to consume. Use natural sweeteners instead.

  • SUGAR. I know... I know... All things in moderation, right? But the American idea of "moderation" and the body's idea of moderation seem to be at odds. Modern science recognizes that sugar is a source of inflammation in the body, and that inflammation is a common cause of preventable disease. So... consider less damaging alternatives (honey, real maple syrup, coconut sugar) and also making even those splurges rare since they tend to increase more sweet cravings. read more here.

  • ALL SODA . This is a no-brainer. We know this. Regular is terrible for you. Diet may be worse.


2. INCREASE REAL NUTRITION

After cutting out garbage, it can initially seem difficult to find nutritious replacements. We are used to eating from boxes and bags and have been desensitized to the long list of ingredients on labels. The following tips will help you navigate...


3. SHOP THE PERIMETER

Most real foods will be found in the produce and refrigerated sections of a grocery store. Avoiding processed, nutrient-deficient foods generally means eliminating many of the middle aisles. Shop fresh.


4. THE FEWER INGREDIENTS, THE BETTER

One-ingredient foods are the best option. If you're buying chicken, you want chicken... not chicken with a list of hard to spell chemicals listed on the label. If you're buying broccoli, you want broccoli... not broccoli, colorants, and preservatives. When buying from a can or a box, go for the one that has the fewest and most recognizable ingredients. For example, a simple can of kidney beans usually contains some form of sugar. Put back the ones that list corn syrup and chemicals... and keep looking until you find the healthiest, fewest ingredients added to your beans.


5. EAT NUTRITIONALLY DENSE FOODS

Long term health does not count calories but weighs nutrition. The best path to weight loss is a body that has the proper fuel when it needs it. If you overeat regularly, calories will add up, but I've got to tell you... it's a lot harder to gain extra weight when you're doubling up on asparagus than if you're doubling up on the pasta. Make the calories count and your appetite will more likely regulate itself. You will remember what it's like to be truly hungry. There won't be bloating to confuse or guilt you. You can just eat.

Also, not all whole foods are created equal. If you are short on nutrients (almost all of us are), then you might want to make your pile of dark leafy greens significantly larger than your pile of rice.


6. EMBRACE THE FAT

It is time to leave the diet fads and pseudo-science of the 1980's behind. Dump the margarine... Embrace the full-fat grass-fed butter. Why? Because margarine is chemically-laden garbage food and your brain and body NEED healthy fats to stay healthy. Every cell in your body is made up of fats... you have a fundamental biologic need for fat.

I have noticed in my own diet that when I eat more healthy fats, my cravings are reduced, I have more energy, less brain fog, and have no trouble with weight gain. When I skimp on the fats, I end up eating more of everything else and struggling with energy.

WHAT FATTY OILS TO GET RID OF COMPLETELY....

vegetable oil
canola oil
cottonseed oil
Trans fats
soybean oil
hydrogenated oil

MY FAVORITE WAYS TO GET MORE HEALTHY FAT IN MY DIET...

avocados
coconut oil
nuts
full fat coconut milk
organic full fat butter
organic bacon... because... bacon.


7. CONSIDER CAREFUL SUPPLEMENTING

Before saying another word about supplements, I must reiterate:

A NOURISHING DIET IS MORE IMPORTANT THAN ANY SUPPLEMENT.  PILLS WILL NOT SAVE YOU FROM BAD FOOD CHOICES. Supplements only become a need when our diet is inadequate. Having said that…

I am a supplement convert. I never "believed" in the idea and thought that I could just get what I needed through food. I was wrong. Countless years of nutrient deprivation from poor eating, malabsorption, and ignorance left me seriously depleted of nutrients. And unfortunately (due to chronic issues and perhaps age), it isn't just correcting itself by eating a steak and a hearty salad periodically. My age and body abuse have left me struggling, and for the first time, I'm leaning on good supplements to get through my days.

It is VERY important to note that the vitamin and supplement industry is unregulated. That means that your Walmart multi-vitamins could very well contain Chinese sawdust... and mold. When testing has been done on OTC supplements, they have regularly been found to falsely advertise content and quantities and harbor such horrid ingredients as I’ve listed above. Additionally, most supplements provide synthetic nutrients and science is still uncertain about if that even benefits our bodies. What to do?

Do your research. Pay more money for supplements that you can source. Don't pop a pill just because it's cheap. You'll pay out the nose for medications to treat disease... why would you skimp on your preventative care? (And because someone always asks, I buy my supplements from doTERRA. Contact me and I'll be happy to share more info.)


8. NEVER STOP LEARNING {FIND GOOD SUPPORT}

I receive many questions from this post since so many details simply won't fit! I will do my best to get to those as I am able and integrate answers in other posts. In the meantime, I will leave you will some of my favorite resources for recipes and wellness. Wondering how to cook a meal with real food? These recipe resources are a great place to start and have helped me out more times than I can count.

And don't forget...

Listen to your body. This is a journey of wellness NOT perfection. Every good choice is a victory. Remember your purpose... Thanks be to God!

Key Lime Cream Cheese Frosting With Essential Oil

When it comes to baking, chocolate with always have my heart, but Summertime in the Northeast is just screaming for citrus. The warm weather is so fleeting here that it's a wonder we don't put the entire region on a perpetual vacation and do nothing but get happy and healthy in the sunshine. 

Lots of sun means lots of celebrations (any excuse will do!) and a big family means that we always have excuses. Birthdays, first sacraments, feast days, picnics, anniversaries... Bring on the celebratory food! 

If you know me, you know I try to keep sugar at a minimum so when I break out a splurge recipe, the kids are over the moon about it. For Easter this year, I brought out our favorite cream cheese whipping cream frosting recipe and altered it to scream SUMMER!!!

You can use this recipe with your favorite essential oils. Orange oil will turn your frosting into an amazing Creamsicle frosting. Lemon would, of course, be amazing. I am itching to try grapefruit. For Easter, I made some of the orange and also some of the Key Lime frosted cupcakes that I'm sharing with you below. 

I don't prefer gluten free box mixes (usually opting for more nutrient dense ingredients) but I wanted to spend more time celebrating than cooking so... I used the delicious and dependable Namaste Vanilla Gluten Free cake mix. (The Amazon price is generally lower than my local grocery store.) You can add a couple drops of essential oil to the mix if you want. I chose to have the frosting be the star. 


Key Lime Frosting 

  • 1 (8 ounce) package cream cheese, softened

  • 1 cup granulated sugar

  • 1 pinch salt

  • 1 -2 teaspoon vanilla

  • 3-6 drops doTERRA Lime essential oil (or to taste)

  • 1 1⁄2 cups heavy whipping cream

  1. In a bowl and using an electric mixer, whip the cream until stiff peaks form.

  2. In a separate large bowl, beat together the cream cheese, sugar, salt, essential oil and vanilla until smooth.

  3. Using a spatula, fold the whipped cream into the cream cheese mixture.

  4. Chill.

  5. Use on cakes, with fresh fruit, or just eat it straight out of the bowl. ;)


Pretty straight forward and really delicious! The original recipe uses almond extract instead of vanilla and remains one of our go-to for all kinds of treats. But the essential oil options give us so many new choices!